Hitler Youth Basics
I have decided to write this article because Hitler Youth, (HJ) knives commonly are the first and most affordable way to start collecting German Edged Weapons. Millions of these were produced between 1933 and wars end. Today they remain relatively affordable and as a result, are often the first dagger purchased by a beginner. During this period, scores of producers, somewhere around 150, were awarded contracts to produce this knife and as a result, there are many variants out there. Hitler Youth knives are widely reproduced and they are a minefield for experienced collectors and even more so for the beginner. The best advice I can give the beginning collector is to buy their first knife from a trusted source preferably a certified dealer who offers a lifetime warranty as to authenticity and an inspection period. This is a very small investment in the hobby. The most common mistake I see is a newbie buying his first dagger from an auction site or at a gun show trying to save a few bucks. I don't know how many times I have seen new collectors throw in the towel after getting taken on their first purchase! Experienced collectors buy from dealers that alone should say something! When holding a known original in your hand many of things I am going to speak about here will come clear. There are very few absolutes when collecting German edged weapons and even fewer when one starts talking about HJ's. This article will provide a list of clues helping you determine authenticity. Please keep in mind they are only clues and one has to look at the entire piece to determine authenticity. Do not write off a piece when you come across the first questionable feature. I do not claim it to be 100% complete, and I have not seen it all, however this should provide enough information to help beginners avoid the most common pitfalls.
There are 3 basic configurations for these knives depending on the period of production. Generally speaking Transitionals are considered the most desirable and the late period RZM's the least. Listed below are characteristics that will help one determine the period of manufacture.
Early Period 1933-1936:
- Thinner blades when compared to late knives
- Magnetic hilt
- A very low or no ricasso
- Maker marked with the name on the blade itself
- Motto
- Thicker blades
- High ricasso
- Display's both the maker name and logo as well as a RZM designation
- Motto
- High ricasso
- RZM marked on the ricasso
- Usually no maker name or logo
- No Motto
The first thing I look for when purchasing an HJ is uniform, normal, period wear to the whole piece. Mint daggers that look like they just came out to the factory yesterday, more often than not, did! There is no better advice I can give you than to start by collecting knives that have honest wear. This just can't be faked. 99.9% of originals display normal wear to the hilt plating, an aged look to the leather, scratches to the scabbard and wear to the blade. When I say uniform I mean that you should not see a mint scabbard and a beat up knife. All components should display relatively the same amount of wear. We need to keep in mind that these knives are 70+ years old and were handled by kids! They were used and abused! Remember your Scout knife.... Sticking with these pieces to start with will save you much heartache.


Blades:
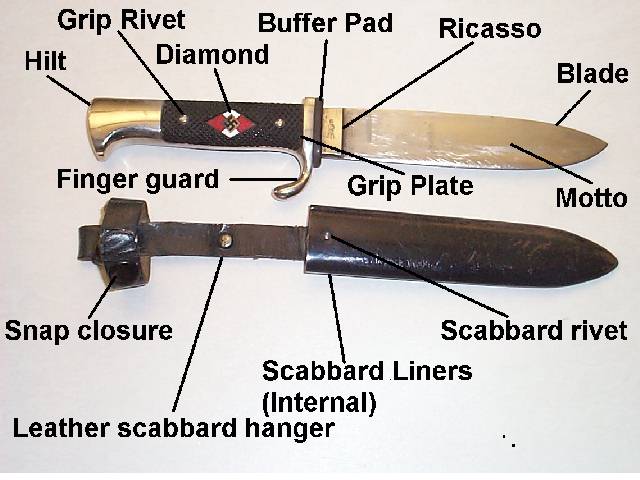
A wide assortment of blades were used and many variants exist. From 1933 to about 1936, before RZM began standardization manufacturing of these blades varied widely. The one feature seen that is a big red flag is the word "Germany" written anywhere on the blade. "Germany" was never written anywhere on any pre-1945 HJ knife or any other German dress dagger. Look at the basic blade shape, does the shape look the same as a known original? Is it sharpened? Does it look aged? Most repros look minty. Fakers usually don't go to the trouble of sharpening their blades. At least, not as roughly as a 10 year old would have in the 30's! Graying, clouding, and pitting take time and again, are not generally seen on fakes. A fingerprint stain can take 25 years to appear. Some daggers were produced without a ricasso. This is not a sign of a reproduction. During this early period all daggers were inscribed with the motto "Blut und Ehre!", transcribed Blood and honor. This inscription was etched not stamped. If you take your nail, not your finger, and run it along the inscription you should be able to feel the etch. Turn the blade over and the maker mark is usually marked approximately one quarter of the way up the blade from the crossguard. This generally states the makers name, logo, and location. In my experience, all blades with a motto will also have a stamped makers name and logo to the reverse. There may or may not be an RZM designation on the blade. After 1938, HJ production became more standardized as RZM influenced more control. All blades became uniform in shape with a ricasso. The motto no longer was applied to the obverse blade and all blades should exhibit an RZM stamp or etch, most often seen on the ricasso. All these blades were issued with a rather thick (approximately 2 to 3 mm) leather buffer pads seated against the crossguard.
Hilt Fittings:

Grip Plates:
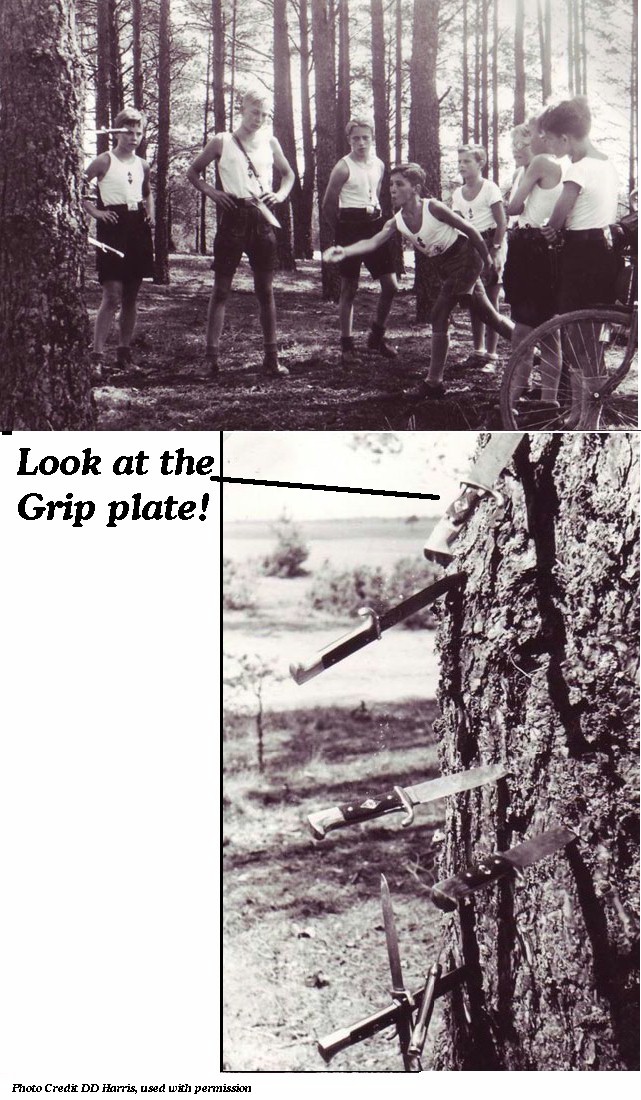
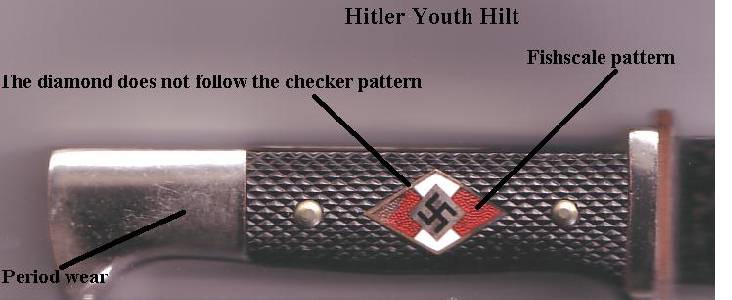
These grip plates were made of an black bakelite. This bakelite was cast in a checker pattern running approximately 45 degrees from the crossguards. There was generally some hand fitting involved in manufacturing. Far more than we are use to seeing today in our mass production world. These grip plates should follow the contours of the hilt and generally be fit well without rattling around.
Rivets:
Grip plates were secured to the hilt using brass, steel nickel plated or aluminum rivets. These rivets are what hold the whole knife together. They run through the grip plates, hilt and blade. Look for smooth dressed heads. The top of the heads may well display period wear as they sit proud of the grip. To the reverse these heads should be smooth and well rounded. The reverse of these rivets were peened over keeping the rivet in place. Despite this, the reverse rivet should appear relatively smooth and free from small individual taps. A rough un-professional finish to the reverse of these rivets are a clue that the knife may have been disassembled at some point often to it's determent.
HJ Diamond:
The obverse plate had a cut out and inlaid with a HJ diamond. In my experience, the cutout in the grip plate generally does not follow the 45 degree pattern in the grip plate. These diamond inlays were quite involved. They were pinned from the reverse into the hilt. They were made in 2 sizes. The earlier ones were the smaller measuring approx 23mmx13mm and the later RZM ones slightly larger at approx 25mmx15mm. Over time they generally loosened ever so slightly. Take the knife in your hand and reflect light off the diamond into your eyes and with your nail ever so gently put a bit of pressure on one corner of the diamond. You should see some movement, ever so slightly. Although some diamonds will not move most originals will. Look at the diamond itself, all the colors should be precisely separated. The red should display a translucent fish scale pattern. This pattern is actually made up of small dots. In most cases, you will see this fish scale pattern. Consider a solid red unpatterned area a red flag. At the other two obtuse corners of the diamond is solid white enamel. Centered is a black swastika on a gold background. This gold background is actually flecked or has a slightly sparkled look when observed under an eye-loop. When observed very closely, coming out from this gold background are tiny lines running to the edges, separating the different color sections. Outlining the entire diamond inlay is a copper colored border (approximately 1 mm) in width. Often the copper has aged to a black. Finally over the entire surface is an enamel coating giving the whole diamond a uniformed smooth look. Often this enamel will be damaged from time and wear. A nice diamond is always sought after and adds value to the knife.
Lastly, have an RZM code that you would like to determine the manufacturer? Here's a list of manufacturers sorted by RZM code.
In summary here is a quick checklist of clues to authenticity:
GOOD:
- Honest even wear
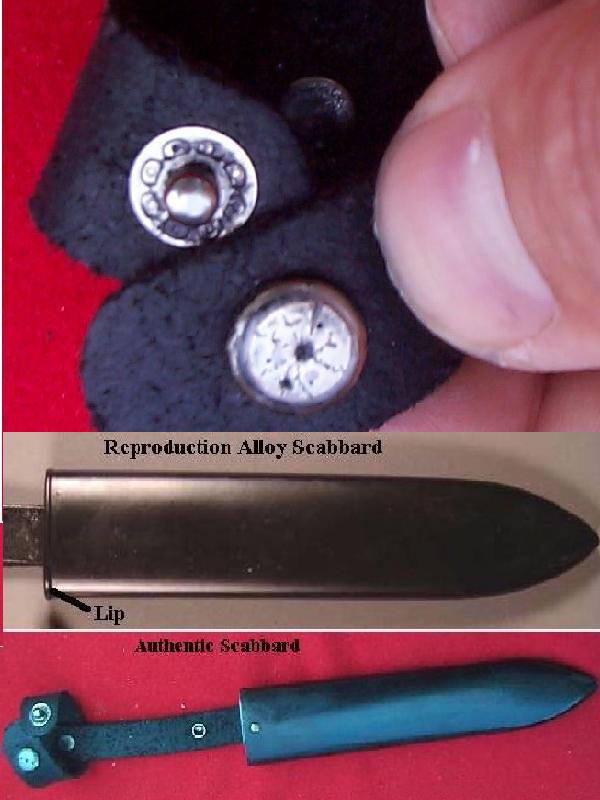
- Magnetic scabbard with rivet to the front
- Cotton liner covers
- Loose HJ diamonds
- Fish scale red enamel
- Flecked gold swastika background
- RZM designation on the obverse, (normally found to reverse) riccasso
- Casting seams on the hilt
- Poorly fit grip plates
- New smelling leather
- Alloy non-magnetic scabbards
- Minty factory fresh
- Banged up poorly formed rivets
- "Germany" anywhere on the knife or scabbard
- Motto with no makers name
- Motto with RZM Blades dated 1939 and later
- Solid red on the diamonds
No comments:
Post a Comment